Saturday, 30 June 2012

Add Custom Permalink In Blogger Blogs

As we all know Blogger is making a lot of changes to compete with WordPress.Blogger had long been known to be missing a lot of the WordPress SEO tools such as automatic meta tags, custom permalink, SEO plug-ins etc.

Blogger has managed to add the automatic meta tags and the custom permalink option to Blogger blogs, but they are yet to come out with Plug-In capabilities for Blogger, which we think will come out at some point of time.

What is a Permalink?

Permalink is the text you see in the URL of a web page, it is called a permalink as it is a permanent link address of a web page where you can find the web page.

Why Use Custom Permalink?

Custom permalink is useful as it can give a desired look to the link of a web page, it can be named so that it is easily remembered.Apart from this it is also very useful for SEO, a custom permalink with the right keywords can have a great impact on the search rankings of a web page or a blog post.Every successful SEO blog uses custom permalink to ensure that they have the right keywords in the link URL.

What Is The Right Permalink Structure?

We always prefer to use a keyword rich permalink, rather than those with a lot of "the" "how" and "what" kind of words, as you can see for this page we have included the three main keywords of this post in the custom permalink - "custom-permalink-blogger".This is rich in keywords and it has the phrase that most people would probably search for.This is the structure we usually use while creating a custom permalink in blogger.


Blogger Custom Permalink

So how to add custom permalink in Blogger?

Adding a custom permalink to blogger is very easy and can be done through the post settings option to the right of the "New Post" area in the new blogger design.

This option does not show up when you log in to Blogger.com, it shows up only when you log in to draft.blogger.com.

So make use of these Blogger SEO options to improve the SEO of your blogger blog and rank higher on Google search.

Thursday, 21 June 2012

Add Adsense Ads Anywhere In Blogger Blog Posts

You may have seen may blogs using adsense ads under the title of a blog post, but you may not have seen many blogs using adsense randomly at different parts of blog posts.This process of adding adsense ads anywhere in the blogger blog posts is a manual one, you will have to add the code every-time you want an ad to appear at a certain place in a blog post, but it is a fairly simple process.Here we will teach you how to add adsense anywhere In Blogger Blog Posts.

Step 1) Open a "New Post", write the content you wanted to write.

Step 2) Get your ad code from Adsense website, it should be place within tags as shown below -
<div align='center'>
<script type="text/javascript"><!--
google_ad_client = "ca-pub-xxxxxxxxxxxx";
/* Large Rectangle */
google_ad_slot = "xxxxxxxxx";
google_ad_width = 336;
google_ad_height = 280;
//-->
</script>
<script type="text/javascript"
src="http://pagead2.googlesyndication.com/pagead/show_ads.js">
</script>
</div>
Make sure that you have copied this code to a notepad which is placed in a place that is easily accessible so that you can use this easily and as often as you like.


Step 3)Go To "HTML" of the blogger post and place the adsense code obtained in step 2 anywhere you like.You are done.


Adsense Anywhere In Blogger Blog Posts

Now you can see the adsense ads appearing wherever you have placed the code in the blog post.The important thing to remember here is that you should not parse your adsense code while trying to place in anywhere in blog posts.


Don't have an Adsense Account Yet? - Try Getting Approved By Google Adsense. Learn more about Making Money Online

Also Read - Wrapping Adsense Ads in Text

Wednesday, 20 June 2012

How To Have Multiple Authors On Blogger Blogs 2012

You might have previously thought that WordPress was the only blogging platform that had multiple author features, but you should know that even Blogger has an option of having multiple authors.The multiple author option in Blogger is very useful if you have many authors contributing to your blog or if you wish to form a group blog on Blogger platform.We will show you the easy way of making a multiple author blog on Blogger.

How To Have Multiple Authors On Blogger Blogs?

Step 1) Visit the settings section of your Blogger Blog -

Multiple Authors On Blogger Blogs Settings

Step 2) Scroll down to see the "Permissions" section and under that "Blog Authors" -

Multiple Authors On Blogger Blogs
Step 3) Use the "Add Authors" option to add new authors by e-mail, once you have done this an email will be sent to the person and they have to accept it.

You can choose whether a person is an author or an admin in Blogger, if you pick a person as an author, they will only be able to post and edit their own posts, they will not be able to see any stats or any comments etc.

If you choose a person as Admin, then they will have all the powers that you have and can even remove you from the blog if they choose to, so be careful about who you make admin on your blog.

Also read - WordPress style author box for Blogger.

I hope this helped and for more please subscribe to us!

Sunday, 10 June 2012

Add Meta Tags To Blogger Blog Posts Automatically

Before the new version of Blogger, there was a difficulty in adding meta tags to each and every individual posts that you made.You would have had to add the meta tags in the template for each one of the blog posts using the "b:if " tags.Now you do not need to do all that cumbersome work.There is a new method of adding meta tag description to any blog post automatically while writing the post itself.It is almost like a WordPress SEO plug-in for blogger blogs.

This tool can be very useful in terms of search engine optimization and ranking high on Google search.This will in turn bring you more traffic to your blog, so I advise you to use this Blogger Meta Tag Tool well.

Here is how to activate the meta tag generator in the blogger edit posts section -

1)Go to Blogger Settings > Search Preferences > Meta Tags. Make this option "Yes" and add some meta tags that are suitable for your blog.

Blogger Blog Meta Tag Automatic


2)Now Go to a "New Post" and you should be able to see the Search Description options in the right hand side under the Post Settings.

Blogger Blog Meta Tag Generator Plug-In

If you are using a Custom Template For Blogger, then you need to add the following code to your Blogger Template, just before </head>

<b:include data='blog' name='all-head-content'/>
Now you should be able to see the Meta Tag Generator Option in the "New Post" even if you have a custom blogger template.

Saturday, 26 May 2012

Add WordPress Style Author Bio Box In Blogger Blogs

Many Blogger Blog users want to have an Author Bio Box, like those seen in WordPress hosted blogs.There is a really simple Blogger Trick to get an Author Bio Box in Blogger Blogs.
Author Bio Box can be useful for those who run multi-author blogs (Blogger Multi-Author Blogs Tutorial Coming Soon!), this tool will automatically put the author box in every article written by a specific author.The Author Bio Box is also useful for blogs like Techgau.org which receive  a lot of guest-posts.

Remember, for this tool to work, your authors must have separate log-in to the blogger blog.They must choose a display name which will be used in the code.
Author Bio Box For Blogger

So here it is - How To Add WordPress Style Author Bio Box In Blogger Blogs?


Step1) CSS For Author Bio Box - 

Visit your Blogger Edit HTML option and press the "Expand Widgets" box.Find this code in your Blogger Blog HTML Template -
 ]]></b:skin> (
Just above it, paste the following Author Bio Box CSS code, this will style the author bio box.You can change the CSS to meet your own style requirements.
.about-author {
background:#EBF3FB none repeat scroll 0 0;
border:1px solid #D4E2E8;
font-size:1em;
line-height:1.5em;
margin:0 0 20px;
padding:10px;
}
.about-author img {
background:#FFFFFF none repeat scroll 0 0;
border:1px solid #9ED0DE;
display:inline;
float:left;
margin:0 15px 0 0;
 }
Step2) Code For Author Bio Box - 
Now find this code - 
<div class='post-footer-line post-footer-line-1'>
Immediately after this code, paste the following Author Bio Box Code -
<div class='about-author'>
<img alt='Display Name' height='100' src='Image URL' width='100'/>
<h4>Author: <a href='Profile URL' target='_blank'><data:post.author/></a></h4>
<p> Short Description</p>
</div>
</b:if>
Step3) Change the bold text in the code, change "Display Name" to the display name chosen by the author, change the "Image URL" to the URL of the image of the author, change "Profile URL" To the website of the author or the profile of the author. Enter a Short Description about the author.


Save! Your author box is now ready, you need to use this code for every author.When an author posts something, the article will contain the author box at the bottom.


I have customized the author box to meet my requirements, you can do so too.Recommended - Blog Name Generator

Monday, 21 May 2012

Add Google Plus Badge To Your Blogger Blog - Circles

Adding a Google Plus badge to your blog or website can increase brand recognition as well as increase your social network.Visitors to a blog often like to relate a blog to a person or a brand, they don't want to see just the text, they want to get to know the person behind the text.So for these reasons, adding a Google+ Badge to your site is vital.

Google+ Badges can be really useful on Blogger Blogs as they create a sense of interaction with your blog readers.Your readers will also be able to Plus One you and also be able to Circle you using this widget.


Adding a Google Plus Badge to your site is very easy -

1)Copy this code onto your clipboard or notepad :
<g:plus href="https://plus.google.com/113909935275352598440" size="badge"></g:plus>


2)Go To your Google Plus Brand Page and get the page Id, the page Id is the numbers you see in the web address of your page.As you can see, I have highlighted this part in the code above.Replace the digits in the code above with your Google+ Page Id.


3)You can change "Badge" To "Smallbadge" if you like to have a smaller version of the Google+ Badge.


4)Add the edited code from the above steps into a new gadget in your "Layout".You can place the gadget wherever you want in the blog.


5)Copy the following code and add it in the <head> section of your blog, before </head>.For this you need to open the "Edit HTML" option from your blogger dashboard.
<script type="text/javascript" src="http://apis.google.com/js/plusone.js"/>
The above code is a Javascript  and it will help execute the Badge when your page loads ( to put in simple words).


6)Save your template.

You should now be able to see your Google+ Badge on your Blogger Blog.Make sure you share this post on Social Networks!


You should now be able to your Google+ Brand Page Badge on your Blog.You can alter the location of the badge by placing the code in Step 1 in the place you want.

Friday, 18 May 2012

Web Design Tips - Menu/Navigation Bar Designing


When it comes to web design, one of the most important aspects is of course the menu. Your navigation is what enables your visitors to find the pages of your site they want to look at and it's also what enables you to categorize what you have on your site and to give it more structure yourself. This is one of the first things that people will look at when they visit your site, and this is what they will use to decide on whether they want to stay on the site or leave, and to decide which pages to view first. There's a lot riding on this decision in other words, so how do you decide what you should include?

Deciding on the Nature of Your Site
Partly the buttons you include in the top or sidebar will reflect the nature of what your site is providing - not in terms of what niche, but in terms of what kind of media. If your site is providing entirely articles and content for instance (such as a blog) then this becomes a lot easier to sort out and it allows you to basically categorize your site and to place different articles on each page. People now know that on each page will be a selection of articles, and so the category is the only title they need.

On the other hand however your site may provide multiple types of media, and this might include things like videos, downloads, a forum or web apps. This then means that you need to help people to navigate to the kind of medium they need. So those categories might become your headings meaning you might want a separate 'articles' page. If you then also have many categories of videos and articles in terms of topics, then you need to either use a combination of menu bars, or you need to organize your pages in a logical way once you get there. Of course you can also have your topics as your headings and then organize the media in such a way that your visitors can find what you need.

What Do You Want People to See?
So whether you decide to organize your headings in terms of the topics, or in terms of the media, will basically come down to what you want people to see. You need then to decide what the selling point of your site is - is it your vast number of media options, or is it your diverse range of topics? Then you need to think about what it is you're trying to push on your site and where you want your viewers to go. Do you want them to go to your shop first? Or your forum? Because in that case you then need to make these prominent in your menu bars.

You also need to think about how clearly your site communicates the subject that it's about - as this is something your menu headings can help to cement. If you are worried people won't know immediately what our site is about, then you should consider using your menu headings in order to help clearly define your subject.

What Do You Want to Hide?
There was a time when you would almost always see a contact tab and a links button in the top menu on any site, but if you're astute you'll have noticed that this is no longer so common. The main reason for this is that you don't benefit from people clicking those buttons - why would you want your visitors to follow links away from your site? And meanwhile bearing in mind that people will often be willing to search for your contact link, why not hide it somewhere to encourage people to look around a bit more? You also need to think about where you want to point Google, and that means including links that will help Google to index the pages you want (and it means certainly not pointing it out of your site).

These are just some basic considerations when creating your menu bars and choosing which links to include. Make sure you consider this long and hard and realize that this is a very important decision for helping to categorize and even define your site.

Must Read - jQuery Website Design Tool

Author:This guest post was written by patrick from YarraWeb, a web design Melbourne company. He believes that many designers and webmasters are ignoring prime real estate on websites by not designing good menu bars.Read our guidelines to be a Guest Author at TechGau.Org

Wednesday, 2 May 2012

Add a Google Sitemap To Your Blogger Blog

Before begining this tutorial on How-to Add a Google Sitemap To Your Blogger Blog, I would like to confirm that this method works for both Blogger blogs such as xyz.blogspot.com as well as self hosted custom domain blogger blogs such as techgau.org.

Google Sitemap tells the Google search engine about all your content pages as well as other pages, this is obviously helpful as it would make it easier for Google to index all your pages.The more pages you have in the Google Search Engine, the more the traffic you will get, so adding a Google Sitemap To Your Blogger Blog is a really good idea in terms of SEO (Search Engine Optimization)

First visit this Google Sitemap Generator for Blogger.Enter you domain name and hit enter.Soon you will see an automatically generated robot.txt document which contains your Google Sitemap of your Blogger blog.

Visit your Blogger Settings page and go to "Search Preferences", here tick the option which says "Custom Robot.txt" and enter the text document you earlier got from the Google Sitemap Generator for Blogger Blogs.


You are done, now you do not need to Ping every-time you update your blog, the sitemap will automatically take care of notifying search engines about all your pages.

Wednesday, 22 February 2012

Blogger Custom Domain 301 Redirect Information

Blogger Custom Domain 301 Redirect Information
Many of you Bloggers may be wanting to get your own custom domain name, but you may be scared about the changes that would come about in terms of SEO, Blog rankings, Alexa Rank, Google Page Rank, Backlinks and brand reputation.Well, here I would like to clear some of these clouds with respect to moving to a custom domain using Blogger.


  • Traffic will not drop once you redirect to a custom domain using the options provided in Blogger Settings.
  • Using 301 Re-Direct (Normal Blogger Re-Direct) will retain 60 to 90% of the original Google page rank your blog had.But you may have to wait for the next Page Rank update before you can see this on your new domain.
  • SEO will not be affected much, you should start Blog commenting and guest writing using your new domain links quickly.
  • Alexa Rank will be lost completely, you will be starting afresh.
  • Most of the backlinks will be retained as Blogger uses 301 Permanent R-Direct, which is a Search Engine friendly type of re-direction.
  • Brand Reputation will not be harmed much unless you do not tell your regular readers about the changes you have made to the blog name and domain. 
I wanted to share some of these experiences with other bloggers as I was looking for this kind of information while I was considering moving to a custom domain after all Blogger blogs got country specific redirection.

Sunday, 5 February 2012

How to Submit your Blogger Sitemap to Google Bing Yahoo?

Sitemaps for your Blogger or Blogspot blogs can be very useful to gain good Search Engine rankings as well as create an easy way for Google bots to crawl your blog and all its pages and posts.So I think you know now why a blogger sitemap is important.Do not waste any more time in waiting or pondering over whether you should submit your blog as a sitemap to Google, Bing or Yahoo!

Blogger Sitemap Generator


Just Visit this Sitemap Generator.Paste in your Blogger Blog address and it will automatically generate a sitemap.

You will need to submit the sitemap manually to Google through webmaster tools.For Bing and Yahoo!, you can automatically submit the sitemap by just clicking on the link provided in the sitemap generator page.

You may be interested in our Blogger Tricks.

Monday, 30 January 2012

All Indian Blogspot Blogs changed to .in instead of .com

Domain name change blogger in com

All the Indian Blogspot Blogs have got a domain make over from Google, all the domains that were previously of the format myblog.blogspot.com are now myblog.blogspot.in.This comes as a shocker of a change as it could have wide implications on the SEO of a Blog as well as the traffic it may receive from other countries.

There has been no official note through Mail by Google as to why this change has occurred.If any one of you receive any official statement please comment below.

The Implications of this new domain change may vary from SEO, Page Rank Loss, Alexa Rank Loss, Old Link juice becoming useless(But seems to me that all the links are just being re-directed to .in and not .com, so backlinks may still remain useful).

Rest assured we will get some sort of a work around if at all the old backlinks to the .com type blogs will be upheld.This is a similar process when you move from one domain name to another.Since Google itself has done it, I feel there is not much need to worry.

Monday, 23 January 2012

How to Schedule Posts in Blogger Blogs

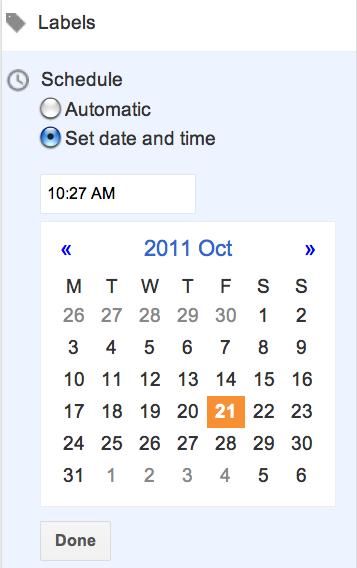
Did you know that you could schedule posts in Blogger? You can actually pick out a date and time in the future when you would like your post to be published.This is a very convenient tool when you are going to be travelling and want to keep up your posting frequency or if you just want to publish an article at a particular time in the future(Such as New Year's, Someones Birthday Etc).You can choose whatever time and date you want the article to be published.Here is how you can do it -

Go to This option called "Schedule" is Post Settings.

Schedule Blogger Posts

Then just select your date and time for Publishing your article, after you have finished writing it.


Schedule Blogger Posts Date Time


It is as simple as that, now go ahead and try it out.Check out all our Blogger Tricks and Blogging Tips.

Saturday, 14 January 2012

Add Twitter Button in HTML - No Java Script - WordPress Blogger

Twitter Buttons usually come in Java Script form, which can slow down your page load time by a small amount, but HTML scripts have no such disadvantage, so why not use HTML for your Twitter Button either in WordPress hosted blog or website or even in a Blogger Blog.


This HTML Code has a few advantages -


  1. Faster Page Load Time.
  2. Shows number of times a Page was Tweeted.
  3. Recommends up to two Twitter Accounts to everyone who tweets using this Twitter Button.
  4. Shortens all URLs to the standard t.co format.
So why wait,  I am sure you are excited to get the Twitter HTML codes, here they are -

1) For Self Hosted WordPress Blog - Just Insert this code anywhere in your Template, the place where you want to Twitter Button to be seen.


<div align="left">
<a href="http://twitter.com/share?url=<?php echo urlencode(the_permalink()); ?>&amp;text=<?php echo urlencode(the_title()); ?>&amp;via=myaccount1&amp;related=myaccount2">Tweet this Article!</a><br><div style="clear: both;font-size: 7px;text-align:left;"><a href="http://product-reviews-prices.blogspot.com/2012/01/add-twitter-button-in-html-no-java.html" target="blank"><font color="black">[HTML Twitter Button]<font></font></font></a></div></br></div>


2)For Blogger Blogs - Just Insert this Code just before <data:post.body> or just before the footer of the Blog, while in Edit HMTL tab.


<a expr:href='"http://twitter.com/share?text=" + data:post.title + "&amp;url=" + data:post.url + "&amp;via=myaccount1&amp;related=myaccount2"'>Tweet this!</a><br><div style="clear: both;font-size: 7px;text-align:left;"><a href="http://product-reviews-prices.blogspot.com/2012/01/add-twitter-button-in-html-no-java.html" target="blank"><font color="black">[HTML Twitter Button]<font></font></font></a></div></br>

Remember to change "Myaccount1" and "Myaccount2" to your two Twitter Usernames, that you want to recommend when someone tweets your articles.

That's it, now you get a fast loading Text Button for a Tweeting option in your Blog Posts.I recommend you use Floating Sharing Buttons.

Friday, 13 January 2012

Add Floating Share Buttons to Blog/Website - Facebook Twitter G+

While an eye-catching blog design with a catchy domain name is vital to blogging success, floating Share buttons can be really handy. Floating Share buttons can be really handy, they go wherever the visitor goes and hence gives a better chance for one of your Blog Posts or website articles to be Tweeted, Facebook Shared, Dugg, Stumbled or Plus oned! We use these Share Buttons On our Tech Blog.

You can add this feature to any Blog or Website, I personally have tried it on Blogger Blogs only but the code is pretty simple so it should work on all platforms, including WordPress(Please Confirm and Tell Me, I do not own a WordPress Domain).This feature include Floating Facebook Share, Twitter Button, Digg! Button, Stumble Upon Button, Google Plus One.So add this feature to your site and start seeing more traffic from Social Networking sites.

Add Floating Share Buttons to Blog/Website -

1)Copy the Following Code as it is -
<!--SideBar Floating Share Buttons Code Start-->
<style>

#pageshare {position:fixed; bottom:15%; right:10px; float:left; border: 1px solid black; border-radius:5px;-moz-border-radius:5px;-webkit-border-radius:5px;background-color:#fafafa;padding:0 0 2px

0;z-index:10;}

#pageshare .sbutton {float:left;clear:both;margin:5px 5px 0 5px;}

.fb_share_count_top {width:48px !important;}

.fb_share_count_top, .fb_share_count_inner {-moz-border-radius:3px;-webkit-border-radius:3px;}

.FBConnectButton_Small, .FBConnectButton_RTL_Small {width:49px !important; -moz-border-radius:3px;-webkit-border-radius:3px;}

.FBConnectButton_Small .FBConnectButton_Text {padding:2px 2px 3px !important;-moz-border-radius:3px;-webkit-border-radius:3px;font-size:8px;}

</style>
<div id='pageshare' title="Share This With Your Friends">
<div class='sbutton' id='gb'><script src="http://connect.facebook.net/en_US/all.js#xfbml=1"></script><fb:like layout="box_count" show_faces="false" font=""></fb:like></div>
<div class='sbutton' id='rt'><a href="http://twitter.com/share" class="twitter-share-button" data-count="vertical" >Tweet</a><script src='http://platform.twitter.com/widgets.js' type="text/javascript"></script></div>
<div class='sbutton' id='gplusone'><script type="text/javascript" src="https://apis.google.com/js/plusone.js"></script><g:plusone size="tall"></g:plusone></div>
<div class='sbutton' id='su'><script src="http://www.stumbleupon.com/hostedbadge.php?s=5"></script></div>
<div class='sbutton' id='digg' style='margin-left:3px;width:48px'><script src='http://widgets.digg.com/buttons.js' type='text/javascript'></script><a class="DiggThisButton DiggMedium"></a></div>
<div class='sbutton' id='fb'><a name="fb_share" type="box_count" href="http://www.facebook.com/sharer.php">Share</a><script src="http://static.ak.fbcdn.net/connect.php/js/FB.Share" type="text/javascript"></script></div><br/><div style="clear: both;font-size: 7px;text-align:center;"><a href="http://www.techgau.org/" target="blank"><font color="black">Tech Blog<font></font></font></a></div></div>


2)Once, you have copied this, add this code in the HTML/JAVA SCRIPT section of "Add New Widget" in Blogger or you can directly paste it into the sidebar of your Website.

Another Option in Blogger or Custom Domain would be to paste this code in the "EDIT HTML" Section just before </body>.

3)You are done.You should see the Floating Share Buttons on your Blog.

If you have any customization questions, please ask in the comments section, I would be glad to help.

Must Read - Add Google+ Share Button 

How To Enable Blogger Threaded Comments With Reply?

Blogger finally rolled a WordPress like Threaded Comments system, in which it is much easier to comment and reply to comments to a specific person.Before we had to use the @ symbol to direct a comment at an individual, but now we can directly reply to their comment in this two tier commenting system.So do you want this new Commenting feature on your Blogger Blog?Then just follow the steps.Remember this new comments system is supported only on the new dynamic views  Blogger Templates.I will soon post a way to get these comments on all custom templates.

Blogger Threaded Comments


How To Enable Blogger Threaded Comments?

1)Set the Feed option to "Full" in the settings tabs - Save it.

Blogger Two Tier Threaded Comments

2)Go to the Comments Settings and Save the settings as "Embedded"

Blogger Threaded Reply Comments
3)That's it! A Simple Blogger Trick this time. Now go to one of your post pages and see that you have a "Reply" option below each comment.

I have to agree that Blogger is moving in the right direction as WordPress is totally dominating it when it comes to Comments Plug Ins, especially with the Do-Follow CommentLuv Plugin. But I personally prefer Facebook comments.Make sure you Subscribe to us!

Friday, 6 January 2012

Add Blogger Widget to appear only on Post or Article Pages

At first when you look at Blogger Dashboard, you may feel that there is nothing much room to customize your template, but actually there is unlimited opportunity to customize your blog to your exact specifications.As part of our Blogger Tricks, today I will teach you How to Add Blogger Widget to appear only on Post or Article Pages.
This means that you will the widget only in your Post Pages and not in your Home Page or Index or Static Pages or even in the Label Pages.

Now for this tutorial, you will first need to know how a Blogger Widget Code Looks Like -

<b:widget id='FollowByEmail1' locked='false' title='Get Articles by Mail Free' type='FollowByEmail'>
<b:includable id='main'>

The Widget Code Comes Here


</b:includable>
</b:widget>
What is shown above is the Basic Widget Code Type. Now go to Edit Html tab of your Design Tab and check the box which says "Expand Widgets"

Widget only on Post Pages


Now find the Widget Code you want, that is the widget which you want only on the Post Pages.This can be done by searching for the name of the widget, Press Control+F5 and enter the name of the widget, you will reach the Widget.

Now Immediately after this code - <b:includable id='main'>  Enter the Following code -
<b:if cond='data:blog.pageType == "item"'>

Now for the final Step, Enter this part of code just before </b:includable>


</b:if>
The Final Code Should Look Like this

<b:widget id='FollowByEmail1' locked='false' title='Get Articles by Mail Free' type='FollowByEmail'>
<b:includable id='main'>
<b:if cond='data:blog.pageType == "item"'>

The Widget Code Comes Here


</b:if>
</b:includable>
</b:widget>
Now you are done, you should see that particular widget only on the Post Pages! Make sure you give this post a link back from your Blog.

Recommended Reading for Bloggers -

Wednesday, 4 January 2012

How to make your Blogger Blog readable on Mobile Phones?

Recently there was a survey of the number of people using mobile phones to surf the internet, and we were all shocked to see that the number of people using mobile Internet has gone up by more than 20 times is the last couple of years due to the onset of more and more complex Smart Phones with excellent browsing capabilities.

A normal blogger blog can take a lot of time to load on a mobile screen and also certain parts of your blog may not appear the way you want it to or it may not appear at all.

So you guys better make your Blogger Blog readable on Mobile Smart Phones and Tablets.So here is how you can make your Blogger Blog readable on Mobile Phones -

1) Go to the Edit HTML Tab under the Design Tab of your Blogger Dashboard -

Blogger Blog for Mobiles


2)Tick the Expand Widgets Button and Find this line of code using Control+F5 -

<b:include data='blog' name='all-head-content'/>


3)Immediately below that piece of code, paste the following code -


<meta content='IE=EmulateIE7' http-equiv='X-UA-Compatible'/>

<b:if cond='data:blog.isMobile'>

<meta content='width=device-width, initial-scale=1.0, user-scalable=0' name='viewport'/>

<b:else/>

<meta content='width=1100' name='viewport'/>

</b:if>
4) You are Done! Now your blog is ready to be visited by Mobile Users and at a very fast speed!

Please remember to link back to us from your blog and also share this post with your Friends.

Recommended post - Add Numbered Page Navigation to your Blogger Blog. Also check out all our Blogger Tricks.

Get Numbered Page Navigation on Blogger Blog - Magazine Style

Numbered Page Navigation adds a good charm to a blog and makes it look more professional, non-bloggers may not realize that Blogger Blogs like our blog, does not come with numbered page navigation.It takes quite a bit of Editing the HTML code of the Blog to get the desired number page navigation.But not to worry, we at Geeks and Nerds Online are here for you and we will teach you each and every step of getting the stylish Numbered Page Navigation on Blogger Blogs.So let us begin-

1)Go to the Formatting Tab under Settings in your Blogger Dashboard and set the number of posts you want in a page, if you select 5, then 5 posts will be shown in the main page, the next 5 articles will be shown in the next page or Page number 2.Use the image for help.

2)Go to the Edit Html Tab under Design and Tick the box which says "Expand Widget".

3)Press Control+F5 and search for the Following Code -


</body>


4)Paste the Following Code right After that line of Code you just Searched - Start to Copy from Just below the Astrix Line till the End of the Astrix Line -


*******
<b:if cond='data:blog.pageType != "item"'>
<b:if cond='data:blog.pageType != "static_page"'>
<script type='text/javascript'>
var pageCount=5;
var displayPageNum=5;
var upPageWord ='Previous';
var downPageWord ='Next';
</script>

<script type='text/javascript'>

//<![CDATA[

function showpageCount(json){var thisUrl=home_page_url;var htmlMap=new Array();var thisNum=1;var postNum=1;var itemCount=0;var fFlag=0;var eFlag=0;var html='';var upPageHtml='';var downPageHtml='';for(var i=0,post;post=json.feed.entry[i];i++){var timestamp1=post.published.$t.substring(0,19)+post.published.$t.substring(23,29);timestamp=encodeURIComponent(timestamp1);var title=post.title.$t;if(title!=''){if(itemCount==0||(itemCount%pageCount==(pageCount-1))){if(thisUrl.indexOf(timestamp)!=-1){thisNum=postNum}if(title!='')postNum++;htmlMap[htmlMap.length]='/search?updated-max='+timestamp+'&max-results='+pageCount}}itemCount++}for(var p=0;p<htmlMap.length;p++){if(p>=(thisNum-displayPageNum-1)&&p<(thisNum+displayPageNum)){if(fFlag==0&&p==thisNum-2){if(thisNum==2){upPageHtml='<span class="showpage"><a href="/">'+upPageWord+'</a></span>'}else{upPageHtml='<span class="showpage"><a href="'+htmlMap[p]+'">'+upPageWord+'</a></span>'}fFlag++}if(p==(thisNum-1)){html+='<span class="showpagePoint">'+thisNum+'</span>'}else{if(p==0){html+='<span class="showpageNum"><a href="/">1</a></span>'}else{html+='<span class="showpageNum"><a href="'+htmlMap[p]+'">'+(p+1)+'</a></span>'}}if(eFlag==0&&p==thisNum){downPageHtml='<span class="showpage"> <a href="'+htmlMap[p]+'">'+downPageWord+'</a></span>';eFlag++}}}if(thisNum>1){html=''+upPageHtml+' '+html+' '}html='<div class="showpageArea" style="padding:10px 10px 10px 10px;"><span style="COLOR: #000;" class="showpageOf"> Pages ('+(postNum-1)+')</span>'+html;if(thisNum<(postNum-1)){html+=downPageHtml}if(postNum==1)postNum++;html+='</div>';var pageArea=document.getElementsByName("pageArea");var blogPager=document.getElementById("blog-pager");if(postNum<=2){html=''}for(var p=0;p<pageArea.length;p++){pageArea[p].innerHTML=html}if(pageArea&&pageArea.length>0){html=''}if(blogPager){blogPager.innerHTML=html}}function showpageCount2(json){var thisUrl=home_page_url;var htmlMap=new Array();var isLablePage=thisUrl.indexOf("/search/label/")!=-1;var thisLable=isLablePage?thisUrl.substr(thisUrl.indexOf("/search/label/")+14,thisUrl.length):"";thisLable=thisLable.indexOf("?")!=-1?thisLable.substr(0,thisLable.indexOf("?")):thisLable;var thisNum=1;var postNum=1;var itemCount=0;var fFlag=0;var eFlag=0;var html='';var upPageHtml='';var downPageHtml='';var labelHtml='<span class="showpageNum"><a href="/search/label/'+thisLable+'?&max-results='+pageCount+'">';var thisUrl=home_page_url;for(var i=0,post;post=json.feed.entry[i];i++){var timestamp1=post.published.$t.substring(0,19)+post.published.$t.substring(23,29);timestamp=encodeURIComponent(timestamp1);var title=post.title.$t;if(title!=''){if(itemCount==0||(itemCount%pageCount==(pageCount-1))){if(thisUrl.indexOf(timestamp)!=-1){thisNum=postNum}if(title!='')postNum++;htmlMap[htmlMap.length]='/search/label/'+thisLable+'?updated-max='+timestamp+'&max-results='+pageCount}}itemCount++}for(var p=0;p<htmlMap.length;p++){if(p>=(thisNum-displayPageNum-1)&&p<(thisNum+displayPageNum)){if(fFlag==0&&p==thisNum-2){if(thisNum==2){upPageHtml=labelHtml+upPageWord+'</a></span>'}else{upPageHtml='<span class="showpage"><a href="'+htmlMap[p]+'">'+upPageWord+'</a></span>'}fFlag++}if(p==(thisNum-1)){html+='<span class="showpagePoint">'+thisNum+'</span>'}else{if(p==0){html=labelHtml+'1</a></span>'}else{html+='<span class="showpageNum"><a href="'+htmlMap[p]+'">'+(p+1)+'</a></span>'}}if(eFlag==0&&p==thisNum){downPageHtml='<span class="showpage"> <a href="'+htmlMap[p]+'">'+downPageWord+'</a></span>';eFlag++}}}if(thisNum>1){if(!isLablePage){html=''+upPageHtml+' '+html+' '}else{html=''+upPageHtml+' '+html+' '}}html='<div class="showpageArea"><span style="COLOR: #000;" class="showpageOf"> Pages ('+(postNum-1)+')</span>'+html;if(thisNum<(postNum-1)){html+=downPageHtml}if(postNum==1)postNum++;html+='</div>';var pageArea=document.getElementsByName("pageArea");var blogPager=document.getElementById("blog-pager");if(postNum<=2){html=''}for(var p=0;p<pageArea.length;p++){pageArea[p].innerHTML=html}if(pageArea&&pageArea.length>0){html=''}if(blogPager){blogPager.innerHTML=html}}var home_page_url=location.href;var thisUrl=home_page_url;if(thisUrl.indexOf("/search/label/")!=-1){if(thisUrl.indexOf("?updated-max")!=-1){var lblname1=thisUrl.substring(thisUrl.indexOf("/search/label/")+14,thisUrl.indexOf("?updated-max"))}else{var lblname1=thisUrl.substring(thisUrl.indexOf("/search/label/")+14,thisUrl.indexOf("?&max"))}}var home_page="/";if(thisUrl.indexOf("?q=")==-1){if(thisUrl.indexOf("/search/label/")==-1){document.write('<script src="'+home_page+'feeds/posts/summary?alt=json-in-script&callback=showpageCount&max-results=99999" ><\/script>')}else{document.write('<script src="'+home_page+'feeds/posts/full/-/'+lblname1+'?alt=json-in-script&callback=showpageCount2&max-results=99999" ><\/script>')}}

//]]>

</script>
</b:if>
</b:if>Blogger TricksCode Ends Here
**********


5) Find all the Instances of the Following Code -

'data:label.url'


6)Replace all the instances of the above found code with -

'data:label.url + &quot;?&amp;max-results=5&quot;'


7)You are done and Now you can enjoy your Numbered Style Page Navigation for Blogger Blogs.Please remember that this may not work for Wordpress Blogs.


If you would like to know about styling your Number Navigation like I have done in this blog, please Request for a Post on that topic in the comments section below.Make sure you give us a link back from your blog.


If you have any other doubts or errors please ask in the comments.Be sure to check out all our Blogger Tricks.

Saturday, 31 December 2011

How to add Polls Inside Blogger Blog Posts|Geeks and Nerds Blogger Tricks


Blogger has a really good Polls widget or gadget, whatever you may want to call it.You can add how many ever answers to each poll, you can set the end date for the polls as well as allow users and visitors of your blog to choose multiple options in the poll as well, but one question remains, How to add a poll inside a blog post in blogger? So lets answer this question today.

So first thing you would want to do is to create a normal poll using the Blogger Poll widget, just like you would do normally.
Poll Question inside Blog Post

So once you are done with adding your Poll on your desired topic, now you go and view your blog from the view blog tab.
Once your are in your blog, view page-source.
Here press Control F and Type in your Poll name.Copy the Iframe with the head line tag.
Now go to New Post tab and you will find, Edit Html tab next to it while you update your blog, go to that tab.
Poll Question inside Blogger Blog Post

Here Paste the Iframe depending on where you want to the poll to be placed within your blog post.
Thats it your are now done, you can answer the sample poll by me here.

Did You find this Blogger Tip useful?


Follow our blog and subscribe to our feeds for more such cool tech tips!

Make sure you check out all the Blogger Tricks.

Meet the Author

Gautham A S

Gautham A S is a personal tech columnist and blogging expert at TechGau.Org, one of the leading Tech, How-To and Blogging Tips blogs